Increasing the logical volume
We use the pvcreate command which creates a physical volume for later use by the logical volume manager (LVM). In this case the physical volume will be our new /dev/sda3 partition.root@Mega:~# pvcreate /dev/sda3 Device /dev/sda3 not found (or ignored by filtering).In order to get around this you can either reboot, or use partprobe/partx as previously mentioned to avoid a reboot, as in this instance the disk does not appear to be there correctly despite showing in “fdisk -l”. After a reboot or partprobe/partx use the same command which will succeed.
root@Mega:~# pvcreate /dev/sda3
  Physical volume "/dev/sda3" successfully created
Next we need to confirm the name of the current volume group using the vgdisplay command. The name will vary depending on your setup, for me it is the name of my test server. vgdisplay provides lots of information on the volume group, I have only shown the name and the current size of it for this example.
root@Mega:~# vgdisplay
  --- Volume group ---
  VG Name               Mega
...
VG Size               19.76 GiB
Now we extend the ‘Mega’ volume group by adding in the physical volume of /dev/sda3 which we created using the pvcreate command earlier.
root@Mega:~# vgextend Mega /dev/sda3
  Volume group "Mega" successfully extended
Using the pvscan command we scan all disks for physical volumes, this should confirm the original /dev/sda5 partition and the newly created physical volume /dev/sda3
root@Mega:~# pvscan
  PV /dev/sda5   VG Mega   lvm2 [19.76 GiB / 0    free]
  PV /dev/sda3   VG Mega   lvm2 [10.00 GiB / 10.00 GiB free]
  Total: 2 [29.75 GiB] / in use: 2 [29.75 GiB] / in no VG: 0 [0   ]
Next we need to increase the logical volume (rather than the physical volume) which basically means we will be taking our original logical volume and extending it over our new partition/physical volume of /dev/sda3. Firstly confirm the name of the logical volume using lvdisplay. This name will vary depending on your setup.
root@Mega:~# lvdisplay
  --- Logical volume ---
  LV Name                /dev/Mega/root
The logical volume is then extended using the lvextend command.
root@Mega:~# lvextend /dev/Mega/root /dev/sda3
  Extending logical volume root to 28.90 GiB
  Logical volume root successfully resized
There is then one final step which is to resize the file system so that it can take advantage of this additional space, this is done using the resize2fs command. Note that this may take some time to complete, it took about 30 seconds for my additional space.
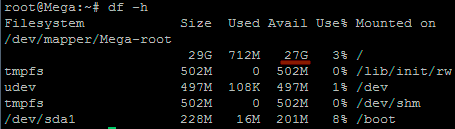
root@Mega:~# resize2fs /dev/Mega/root
resize2fs 1.41.12 (17-May-2010)
Filesystem at /dev/Mega/root is mounted on /; on-line resizing required
old desc_blocks = 2, new_desc_blocks = 2
Performing an on-line resize of /dev/Mega/root to 7576576 (4k) blocks.
The filesystem on /dev/Mega/root is now 7576576 blocks long.
That’s it, now with the ‘df’ command we can see that the total available disk space has been increased.

Seja Membro Gratuítamente
Assine a newsletter para receber em seu email as publicações atualizadas neste blog